Sunday, May 25, 2008

Walking L.A. #16 - Miracle Mile

Our friend Kevin joined us for this walk which meandered through the Miracle Mile district where he works at E! Networks.

The walk began at Hancock Park (a real park, not the wealthy LA neighborhood of the same name). This park is home to the infamous La Brea Tar Pits and the adjacent LA Country Museum of Art. We paused briefly by the tar pits to see if we could get the smell to trigger our memory of childhood playground asphalt on a hot day, something our book mentioned we might experience. It didn't work at first, but as we walked away from the tar pits, a gentle breeze indeed carried the scent we were waiting for. We skipped the Page Museum which is dedicated the ancient history of the area since we'd all been there at some point in our lives.

Next we passed by a new part of LACMA called BCAM which stands for Broad Contemporary Art Museum. In front of BCAM was a giant red toy firetruck and closer to Wilshire was a display of lamp posts. We paused here to take some pictures.

We stopped for lunch at Farmers Market on 3rd and Fairfax. I had fried catfish and jambalaya at one of my favorite eateries, The Gumbo Pot. My friend Kevin grabbed a savory crepe from the French Crepe Company. After lunch we walked quickly through The Grove, one of those generic, outdoor, fake-urban, Disneylandesque shopping malls that everyone but me seems to love.

We left The Grove to walk through a nice neighborhood called Miracle Mile North, one of the district's several HPOZ's. Very nice homes in a very central location. Wish we could afford to live there. We finished up the walk passing through the Park La Brea high-rises. It was the first time I had walked through Park La Brea, and I wasn't impressed, although it seems that many people like it.

The next walk is Carthay Circle and South Carthay.

Walking L.A.: 36 Walking Tours Exploring Stairways, Streets and Buildings You Never Knew Existed

Saturday, May 17, 2008

Cloud Studio Released

Cloud Services just launched Cloud Studio which is a java-based desktop application for managing images and instances in Amazon's EC2. I've yet to try it, but from the screenshots, it looks really nice. I'm not sure, though, if it does anything more than the very capable Elasticfox which runs right in your Firefox browser. Cloud Studio is also available as an Eclipse plugin which is really convenient for Java developers and users of the popular open source IDE.

GUI's like Elasticfox and Cloud Studio make working with Amazon EC2 really easy. Now I wish someone would create similar management tools for Amazon's SQS and SimpleDB. I'd like to be able to list, see stats for, and manage my SQS queues and SimpleDB domains, items, and attributes without having to run command line scripts. Hint, hint, Cloud Services!

Sunday, May 11, 2008

ejabberd on Amazon EC2 Ubuntu AMI

It turned out to be harder that I expected to setup a Jabber (XMPP) server on an Ubuntu virtual machine (ami-ce44a1a7) within Amazon EC2. I chose to setup ejabberd since it was an easy to install via apt-get. I was a little nervous about working with a server built with Erlang since I knew nothing about it, but it was a reputable server and I was counting on not needing to have any Erlang knowledge to work with ejabberd. That was a correct assumption for the most part.

First, I logged into the VM and installed ejabberd:
apt-get install ejabberd
Next I edited the ejabberd config file, /etc/ejabberd/ejabberd.cfg, making kweiner@jabber.pop140.com an admin user and setting the hostname as jabber.pop140.com:
%% Admin user
{acl, admin, {user, "kweiner", "jabber.pop140.com"}}.

%% Hostname
{hosts, ["jabber.pop140.com"]}.
Next, I restarted the server and registered kweiner as a new user:
/etc/init.d/ejabberd restart
ejabberdctl register kweiner jabber.pop140.com mypasswd
Then I authorized traffic on ports 5222 (Jabber), 5223 (Jabber encrypted for old clients), 5269 (Other Jabber servers), and 5280 (Jabber web admin tool):
ec2-authorize default -p 5222
ec2-authorize default -p 5223
ec2-authorize default -p 5269
ec2-authorize default -p 5280
I could now hit the admin screen on which I logged in as kweiner@jabber.pop140.com:
http://jabber.pop140.com:5280/admin/
From here it was possible to add new users and browse server statistics. I experimented with adding users and using various Jabber clients like Gajim to send messages from one user to another.

My first problem came when I tried to communicate with users registered in other Jabber servers like Jabber.org and Google Talk. I struggled for hours trying to figure out why users on my server couldn't communicate with users from these other servers. Thankfully James Murty gave me a bit of help on this Jabber on EC2 message board thread. It turned out that I needed to configure SRV records in my DNS settings.

I logged into GoDaddy where my domain is registered and configured SRV records as follows:


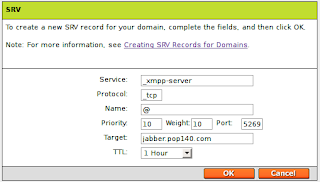
After this, I was able to use nslookup to verify that the SRV records were setup properly:
kweiner~$ nslookup
> set type=srv
> _xmpp-server._tcp.pop140.com
Server: 66.75.160.63
Address: 66.75.160.63#53

Non-authoritative answer:
_xmpp-server._tcp.pop140.com service = 10 10 5269 jabber.pop140.com.
That did it! My jabber server was finally federating with other jabber servers and my users could talk to their users.

I encountered my next big problem when I tried to use jabber again after terminating and relaunching my AMI. ejabberd failed to start and I found the following error message in the /var/log/ejabberd/ejabberd.log:
application: ejabberd
exited: {bad_return,{{ejabberd_app,start,[normal,[]]},
{'EXIT',{{badmatch,{aborted,{no_exists,config}}},
[{ejabberd_config,set_opts,1},
{ejabberd_app,start,2},
{application_master,start_it_old,4}]}}}}

After some googling, I found that ejabberd associates itself with an Erlang node name, a concept I don't really understand that well. By default the node name was dynamically set based on the hostname for the machine. It looked something like this: ejabberd@domU-12-31-38-00-9D-63. This node name is somehow linked to the Mnesia database stored as files within /var/lib/ejabberd. The problem is that the hostname and therefore the node name changes everytime the AMI is relaunched which confuses ejabberd.

One solution I found is to explicitly set the node name. I did this by modifying /etc/default/ejabberd adding the line:
export ERLANG_NODE=ejabberd@jabber
This requires adding jabber as a host name inside /etc/hosts:
127.0.0.1 localhost.localdomain localhost jabber
I made those changes, removed all the database files from /var/lib/ejabberd, and restarted ejabberd. That did it! The node name was the same regardless of the hostname associated with the particular AMI instance.

This was a lot of effort, but it probably would have been easier if I had been familiar with Erlang applications and SRV DNS settings. I hope this post helps someone else struggling to setup ejabberd on EC2 as I did.

Tuesday, May 06, 2008

Amazon EC2 - My First Step into the Cloud

Ever since returning from the Web 2.0 Expo in San Francisco last month, I have been excited about learning how to setup a machine in the Amazon Elastic Compute Cloud (EC2). My first goal was just to get a Linux machine running in the cloud on which later I will try to install enough software to get a basic web application running.

To learn what to do, I consulted a the Programming Amazon Web Services book which is fortunately available on Safari Online. In parallel I read the Getting Started Guide on Amazon's website. The steps to get a virtual machine running were roughly the following:
  • Register for Amazon EC2.
  • Download a X.509 certificate private key and public key pair and store them in a ~/.ec2 directory on my computer.
  • Take note of my AWS account number.
  • Download the Amazon EC2 Command-Line Tools
  • Set environment variables: EC2_HOME, EC2_PRIVATE_KEY, EC2_CERT
  • Run ec2-describe-images -o self -o amazon to search for images.
  • Generate keypair using ec2-add-keypair gsg-keypair
  • Fired up the Getting Started AMI with ec2-run-instances ami-2bb65342 -k gsg-keypair
  • Open SSH and HTTP ports: ec2-authorize default -p 22, ec2-authorize default -p 80
  • SSH into the instance: ssh -i id_rsa_gsg_keypair root@ec2-75-101-209-13.compute-1.amazonaws.com
  • Access the instance's web server: http://ec2-75-101-209-13.compute-1.amazonaws.com/
  • Shutdown the instance: ec2-terminate-instances i-db6ea2b2
That's it! Everything worked as advertised and I got through all of that in less than an hour. This whole procedure cost me about 10 cents. I am looking forward to my next goal which is to find an Ubuntu server image, install a database with data, and learn how to preserve the data so that it survives an image restart.